Guide to observing remotely with ALFOSC
This page contains specific instructions for the Stockholm school 2014.
This page only describes things that are special for the remote
observing procedure. All things related to observing with ALFOSC are
documented on the main ALFOSC web
pages.
Communication
- In case of any doubts or questions, please contact the control
room directly using the `skype' connection. If not available or
nobody is in the control room (e.g., in the daytime) please call the
control room (+34-922405660) or the service building
(+34-922405663).
Preparations
Logging in
- Open a terminal on your computer
- Log in to the computer at the telescope using the following
command
ssh -X
remoteobs@tessa.not.iac.es
This is only possible from computers with a previously registered
IP number.
- You will be prompted for a password which will be supplied by
the NOT staff.
Starting the control software
- Once logged in to tessa (in the above mentioned terminal) type
startobssys remotealfosc
then type the TCS access-code when prompted. The TCS access-code
changes every day at noon UT. For this reason the observing system
needs to be restarted every day and the TCS access-code should be
obtained in advance from the NOT staff on La Palma (see above for
contact information).
In case there is already a ALFOSC observing session running this
command will fail. Contact the telescope to resolve this.
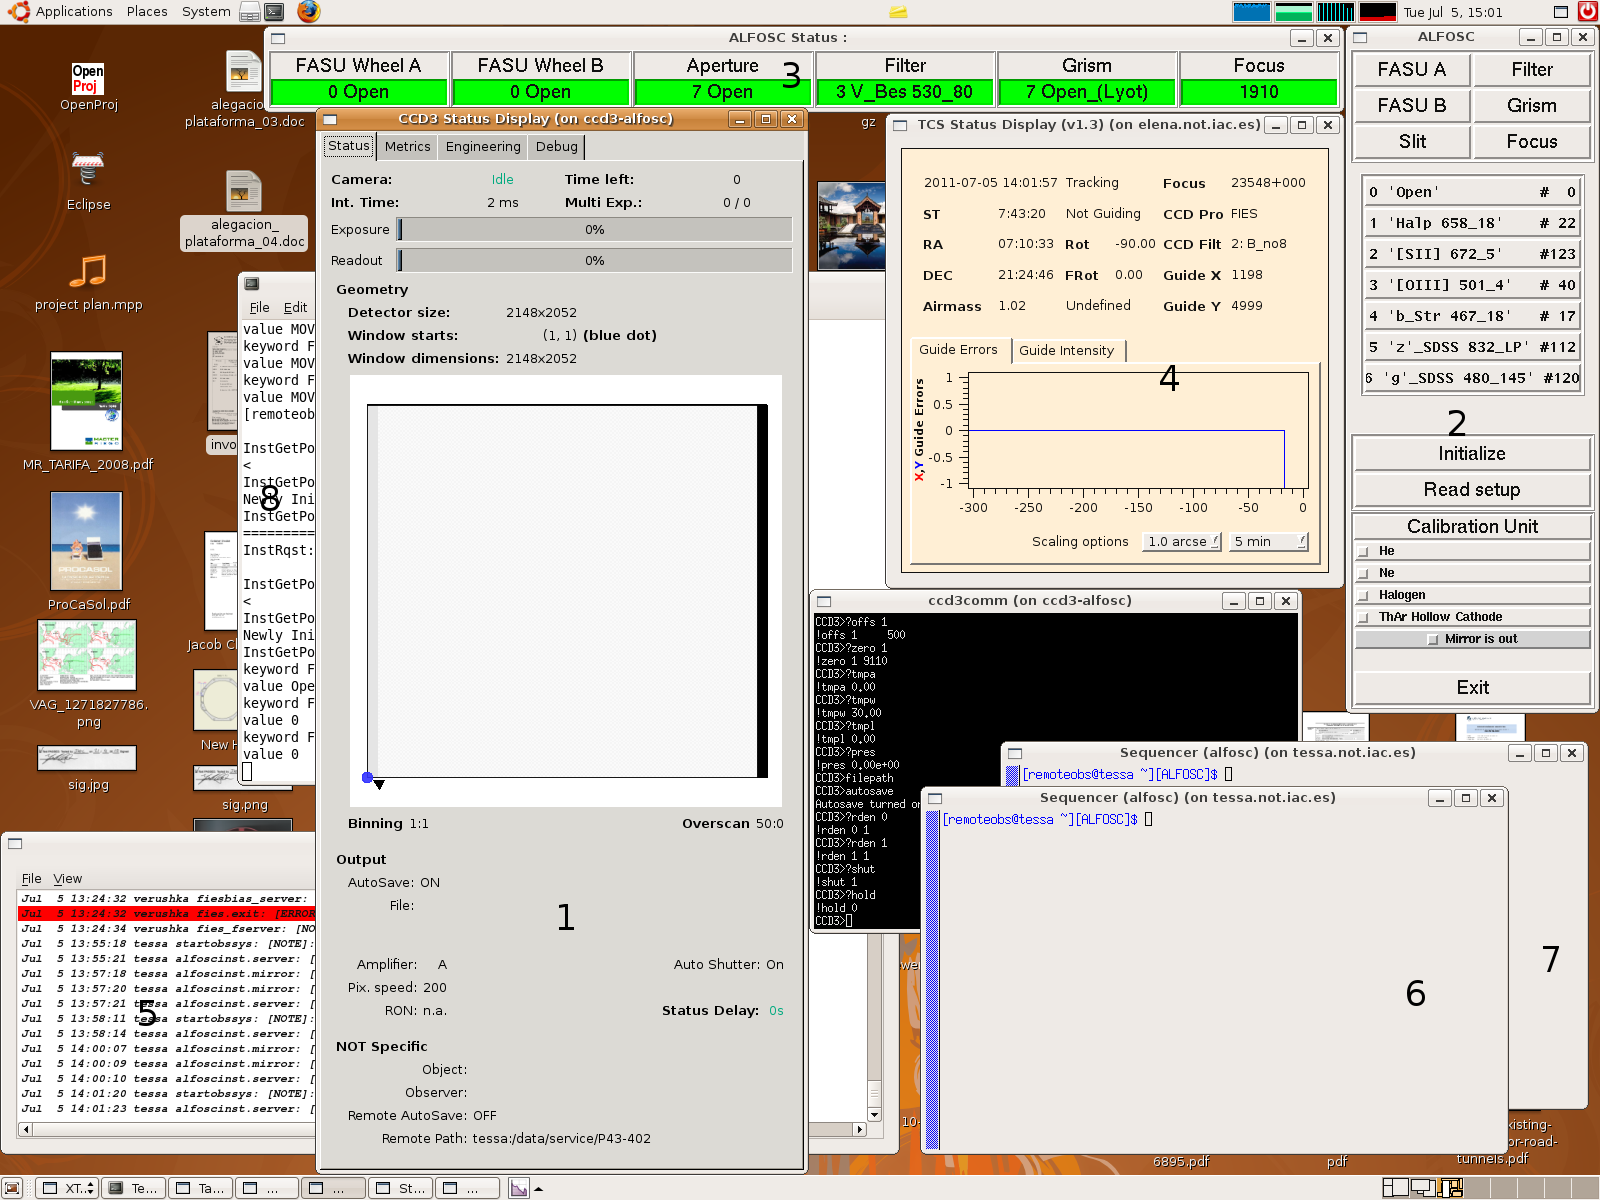
The `startobssys remotealfosc' command will open a total of 8
windows (see picture here):
- 2 `sequencer' terminals (6) and (7)
- A CCD status windows (1)
- The ALFOSC instrument status display (3)
- The ALFOSC instrument control (2)
- the TCS status display (4)
- a `Talker' window which provides status, warning and error
message for the observing system (5).
- a small `tech-xterm' window in which the low-level
communication messages with the instrument can be seen. This window
can be `minimized' (8).
The command takes some time to startup and depending on the
connection it will take some time for all windows to appear.
- To operate the system, commands can be typed in the two
sequencer terminals.
To close a sequencer terminal type 'exit' at its
prompt. You can always get another sequencer terminal, using the
command 'seqterm'. This is possible from any sequencer
terminal window as well as any other terminal window logged in
on tessa.
Starting the postprocessing image display
- Open a terminal on your computer
- Log in to the computer at the telescope using the following
command
ssh -X
remoteobs@elena.not.iac.es
This is only possible from computers with a previously registered
IP number.
- You will be prompted for a password which will be supplied by
the NOT staff.
- In the terminal window a line of text similar to this will
appear:
setdisplay
'localhost:18.0'
- Copy and paste that line into the ALFOSC sequencer terminal
- Type in the ALFOSC sequencer terminal
display-start
An empty DS9 window should appear. HAVE PATIENCE. This may take some
time.
ALFOSC FITS images will be displayed in the DS9 window
automatically after they have been saved.
- For best results, choose the 'Scale' option 'zscale' in the DS9
display.
- In the second sequencer terminal, type
alfosc.imexam which will
display a graphics window (HAVE PATIENCE) and put the cursor in
imexam mode on the image loaded into the DS9 window. As new images
gets loaded into the DS9, the imexam task will automatically work on
these, so there is no reason to quit the imexam task after every
analysis.
Accessing data
- The data taken can be retrieved with 'ftp' from the computer
ftp.not.iac.es.
- Read more instructions about it in here
Observing with ALFOSC
- Target and/or (daytime) calibration observation can now been
made with ALFOSC through commands in the ALFOSC sequencer
windows.
- Observing with ALFOSC and use of the sequencer system is
described in detail on the ALFOSC web
pages
- Some often-used commands:
| alfosc.expose | to make an exposure |
| alfosc.dark | to make a dark/bias |
| alfosc.bin | set CCD binning |
| alfosc.xbeg | set CCD window |
| alfosc.ybeg | set CCD window |
| alfosc.xsize | set CCD window |
| alfosc.ysize | set CCD window |
| alfosc.resetxy | to reset CCD parameters |
| alfosc.object | to set the OBJECT header |
| alfosc.imexam | to start an IRAF 'imexamine' session on the displayed image |
| alfosc.teloffset | to offset the object relative to CCD |
- Documentation of
ALFOSC/telescope Sequencer commands and scripts
- Note, it is recommended to set optical elements and calibration unit mirror by clicking the UIF, instead of using
scripts such as alfosc.acquisition, alfosc.allopen, alfosc.wheels etc.
These scripts may gave an instrument time-out (see
Fault 1563 and
Fault 1790)
Target catalogue
Start of the night
Note that for this school the NOT staff will take twilight flat fields
and focus the telescope at the start of the night, after which the
remote observers are expected to start-up the system and and start
observing. This will be around UT 20:40. Tartu local time is UT+3h!
Setup the telescope
- To set-up the telescope at the start of the night, and after
every switch from another instrument (e.g. from FIES), the
following commands should be executed in any sequencer window
tcs.setup-tel-alfosc
- The above command sets the telescope focus to the default value,
so you may want to set it to the value found in the beginning of
the night (ask control room if you don't know):
tcs.focus-position 23xxx
Spectroscopy: Define the parallactic angle
At every switch from horizontal to vertical slit (and vice-versa) one
of the following commands should be executed.
Moving the telescope to a target
- Select the target that you want to observe
- Switch off autoguiding:
tcs.ag-off
- For safety reasons, always contact the NOT staff at the
telescope before moving to make sure it is safe to move
- IMAGING: To move the telescope to the object, type in the
sequencer window the command
tcs.guide-object
<my-object-name> where <my-object-name> is
the name of the target in the TCS catalog
- SPECTROSCOPY: First make sure that the parallactic angle is
defined correctly (see above).
To move the telescope to the
object, type in any sequencer window the commands
tcs.find-object
<my-object-name>
tcs.preset-with-parallactic-angle-to-selected
where <my-object-name> is the name of the target in the TCS
catalog
Assessing the data log
You can keep an eye of recorded images during the night (an 'obslog')
by producing an End-of-Night report already at the start of the night
and reload the content when needed: - Access the EON report
form
http://www.not.iac.es/observing/forms/eon/, providing the proposal
number and date as requested.
- Do not fill in any
information at this stage, just submit the EON form.
- Follow the URL displayed to view the online EON report. The online
report includes an up-to-date listing of all images taken that
night.
- Refresh the page as often as required to update the
image listing. The full URL of the page is unique and the only way of
accessing the report. Do not loose it.
Assessing the data with the postprocessing system
- Spectroscopic data will automatically be reduced by the
quickspec postprocessing script which will show the reduced
spectrum in a dedicated graphics window.
This script can also
be run from the the ALFOSC sequencer terminal with
alfosc.quickspec
- Furthermore, any frame that is saved to disk will be displayed
in the postprocessing display. If the
imexam task is active on the 2nd sequencer window, you can
obtain obtain plots, statistics, etc. using the imexam facilities
immediately. Alternatively, use imexamin in IRAF on your downloaded
image locally.
- For the focussing and slit-acquisition procedures described
below the postprocessing display will allow you to interactively
point at your targets (stars/galaxies/etc.) during the procedure.
Imaging: Filter focus offsets
- When inserting an imaging filter or spectroscopic order-blocking
filter in the beam, the telescope focus might need a correction.
Follow the procedure described on this
page.
Spectroscopy: Setting the slit angle (to get 2 objects on the slit)
Imaging: Setting North-is-up
If the field rotation is changed, e.g., to orient a slit along 2
object (see here), the following command
should be executed.
- To set North-is-up on the CCD, set the rotator angle with
tcs.field-rotation 90
Spectroscopy: Centering the target on a slit
- To position a star on the slit follow the procedure given
here.
To speed-up the procedure we suggest you window the CCD by executing
the focuswindow script in the sequencer window at the start.
Very important: Quit any active imexam sessions prior to
running the `slitoff' task
In situations where the speed of the network connection is slow, an alternative procedure can be used for centering the target on the slit:
You can also use this method on binned and windowed images. Just remember to
use the 'xbin'/'ybin' options to specify the binning in each direction and the
'xbeg'/'ybeg' option to specify the x and y of the beginning of the window.
The complete command, with all the possible parameters, is:
alfosc.remote-slitoff slit=<slitnumber>
xstar=<x-coord> ystar=<y-coord> xbin=<x-bin>
ybin=<y-bin>
xbeg=<x-start>ybeg=<y-start>
Web camera view of the NOT control room
A web page that will show an web camera image of the NOT control room
is provided. It is updated every 3 seconds. The NOT staff will
control where it points. The
page is accessed here.
The page is password protected. The username and password can be
obtained from the NOT staff.
Shutting down
Each student group is expected to shutdown the observing system at the
end of their session.
- To shut down the instrument software, type in a terminal window
logged in on tessa
shutdownobssys
remotealfosc
and wait a little while. You can use the terminal window you used
for starting the software.
Note that you can operate both the instrument and the telescope
from the remote observing system. To avoid any problem
always shut down the remotealfosc observing system when you are
not using it!
- As the final step, fill out the EON report, now with all
details.
|
