NOTCam Cooling
If the PTR has stopped
If the PTR has stopped when it is supposed to be running and NOTCam is
supposed to be kept cold, then:
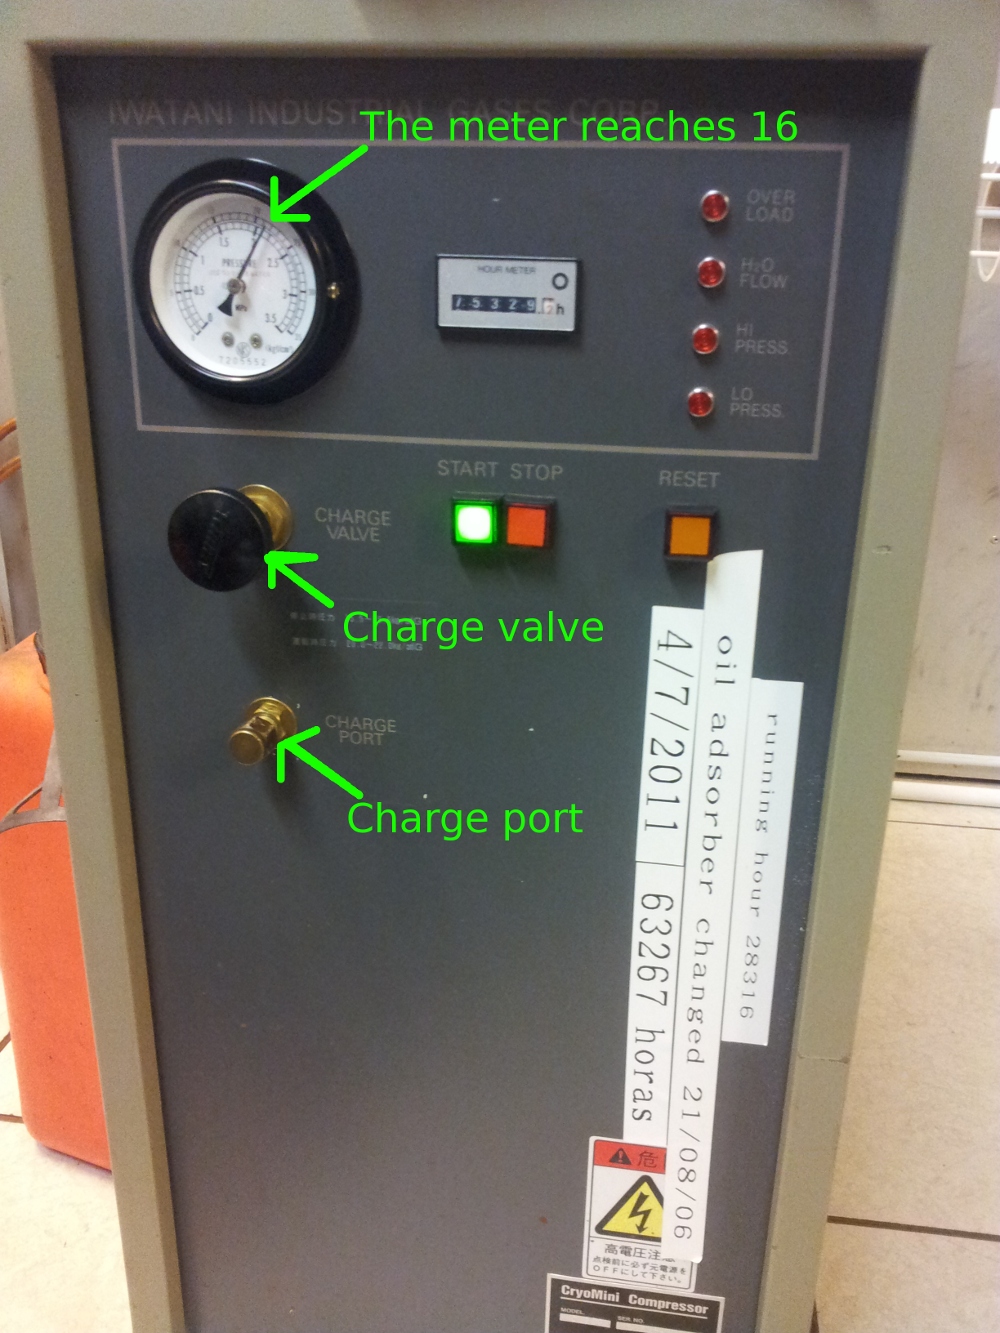
- Go to the PTR compressor in the machine room and check what is the
error message out of the four possible: "H2O flow", "LO PRESS",
"HI PRESS", or "Overload", indicated by a red light at the upper right
of the compressor front panel.
- If the error is "H2O flow" then the cooling water is outside the
allowed range of 10-30 degree Celsius. First try to get air bubbles out of
the system by opening the PURG-O-MAT air-escape valve for a few seconds,
perhaps also knock or shake it a bit. If this did
not help, then see description on how to adjust the water flow under
points 4 - 8 below under Special PTR Instructions
- If the error is "LO PRESS" this means there is too little Helium in
the system. See the instructions for
Filling the PTR with He.
- In order to reset the compressor press first the reset button.
- Now you can try to re-start it again, by pressing the green Start
button. Be aware that it takes up to a minute before the PTR starts to
run fully. Wait at least 10 minutes to restart after
the compressor has stopped otherwise the lifetime of the system
will be shortened.
Instructions for cooling NOTCam down from a warm state.
In all normal conditions we use the PTR to bring the dewar temperature
down as far as possible before filling with LN2. With the PTR alone it
takes about 18 hours to bring NOTCam down from +15 to about -50 degrees.
Therefore, it is recommended to start the PTR in the afternoon, at the
latest, such that LN2 cooling can start the next morning.
NB! The array controller should be turned OFF during
cool down!
Only in exceptional cases should LN2 be filled directly into a warm
vessel in order to save time. According to our experience the cooling
rate is at most 0.8 K per minute when filling "aggressively" with LN2.
Note that the requirement from Rockwell is that the cooling rate
is less than 1 K per minute.
When the vacuum pressure is below 10-2 mBar, it is safe to start
cooling. If 10-2 mBar is not achieved within 24 hours, there might
be a leak. In June 2001 we reached 5.3 ×10⁻³ mBar in 48 hours.
Normally the PTR is connected and
ready, and you can skip the following steps under Special PTR
instructions.
Follow instructions from section Starting the
PTR.
Special PTR instructions
The PTR (or CryoMini) manual is found in the right cupboard
on the observing floor together with the PTR tools.
- Check that the PTR rotary valve has been connected correctly to NOTCam.
This is usually done as part of the transport-to-dome procedure. If
not, then follow the instructions in the CryoMini manual. Look at
the drawing, and use the proper PTR tools. Place the
tube vertical in line with the mounting piece, and turn the knob by
hand as long as it goes easy, while holding it straight. Then use the
tools and tighten quickly (in order to minimize helium leakage) until
fully connected.
- Check that there is power on the compressor, which is in the machine
room on the floor and next to the door from the entrance hall.
If there is no illuminated red light on the front of the compressor
then go in to the electronics room (sometimes referred to as the filter
room) and at the switchboard (where the two keys are for the telescope
power), behind door 2H, turn on the compressor using the switch labelled
NOTCAM PTR (up is on). Also check that the earth leakage breaker next
to it is on (up).
- You should not need to do this, but check that the pink coloured cooling
water pump, mounted on the wall behind the compressor, is running, it
will be vibrating slightly if it is on. If the pump is not running you
probably only need to plug it into the mains behind the compressor.
Connect the cable with the switch
off, then switch power on. Now you have recirculation to the cooler on
the dome floor.
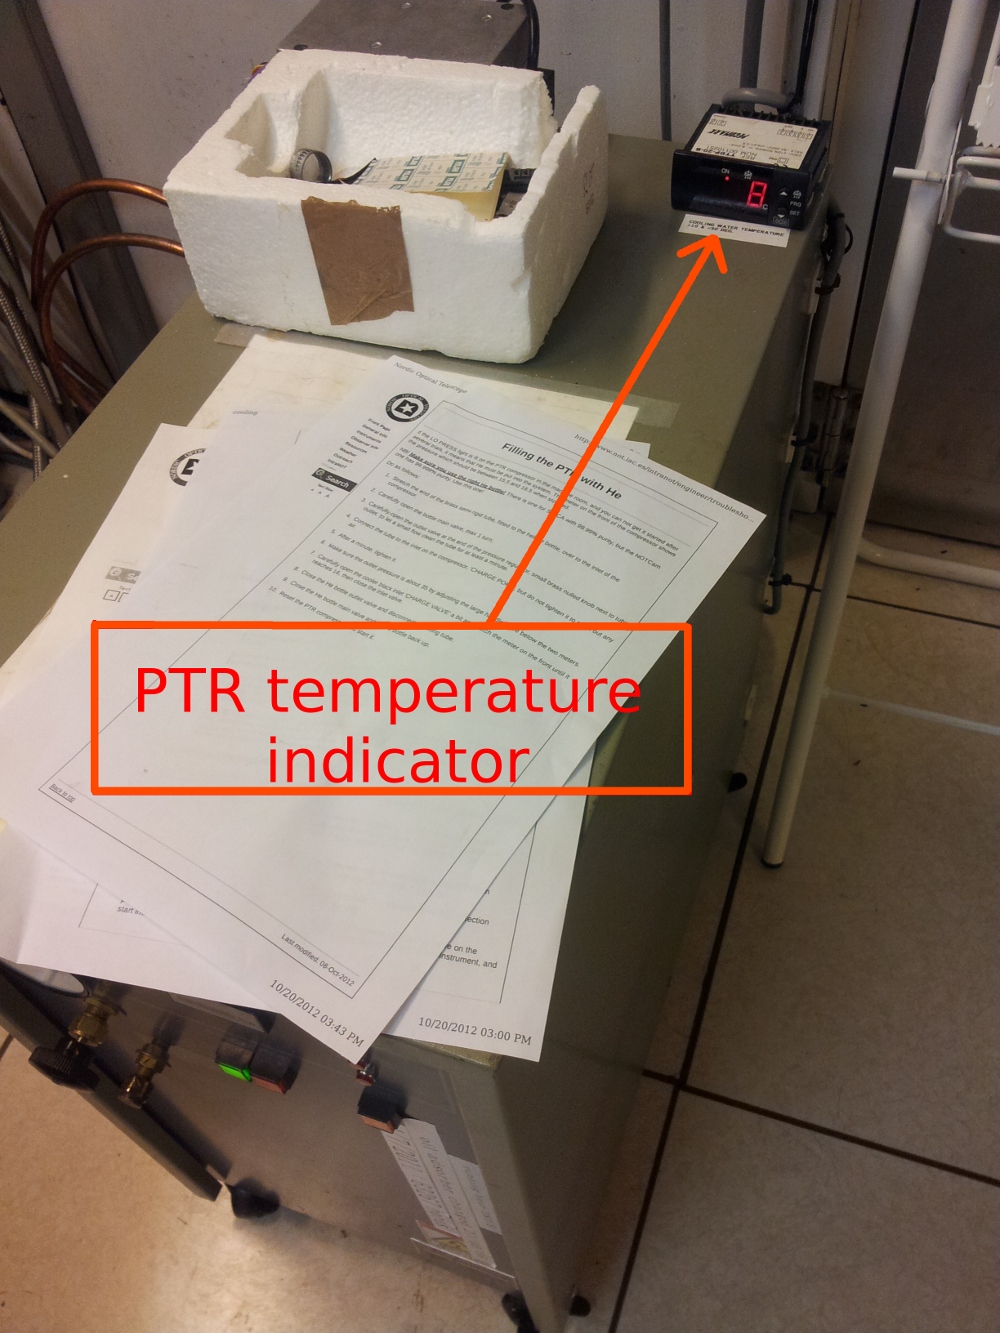
- The temperature of the cooling water is shown on
the digital display mounted on top of the PTR compressor. When the
PTR is running, the water temperature should be between 10 and 30
degrees.
If the PTR is not running it is normally below 10 degrees, but it should
quickly rise as soon as the PTR is switched on.
- The PTR is turned on by pressing the green button on the front panel
of the compressor. If the PTR has stopped because of some error, a red
lamp
on the front panel will indicate which error caused it to stop. You have
to press "reset" before you try to turn on the PTR again.
- If after a minute or so the compressor turns itself
off with the "LO PRESS" lamp illuminated then you need to fill the PTR
with helium by following the Filling PTR with He
instructions.
- If the displayed temperature stays out of range, or if the PTR stops
with the "H2O flow" lamp illuminated, then there are
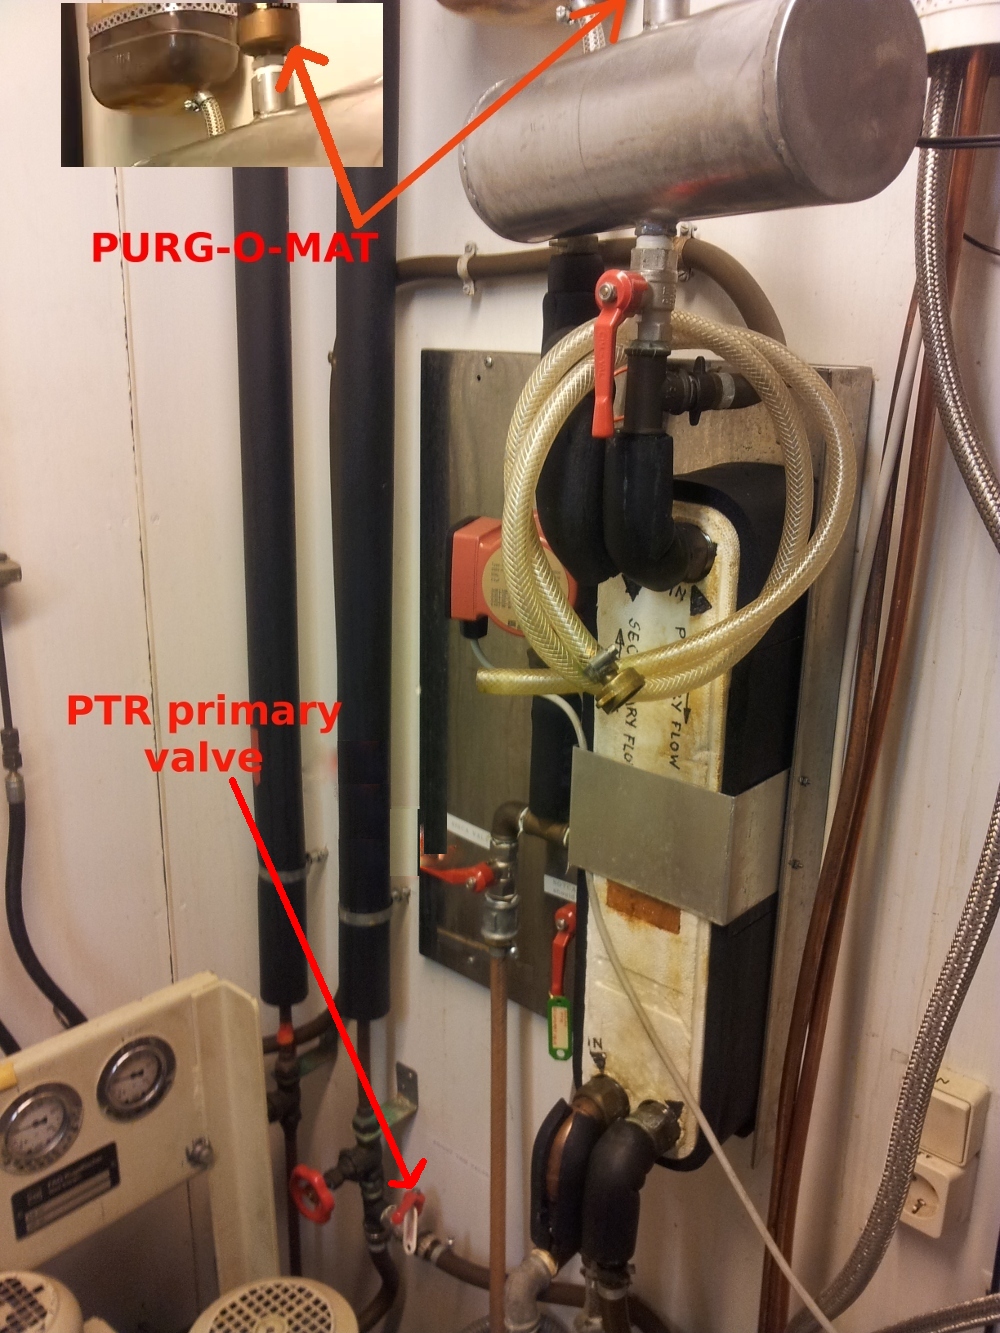
problems with the water flow. Try first to get rid of possible air
bubbles by opening the PURG-O-MAT air-escape valve for a few seconds
until water comes out. If no air came out and this did not help, you
you may need to adjust the PTR water cooling valves. There are two
red valves called
PTR primary and PTR secondary, located on the wall to the
left of the compressor, behind the hydraulics.
Don't touch the one labelled SIRCA! The PTR secondary valve
should always be fully open. The PTR primary valve is usually
only open by just 10 degrees from closed position. (It is closed when
it is at right angles to the tube.) This is
the one to adjust. If you want to increase the temperature it should be
more closed, and if you want to decrease the temperature it should be
opened a bit. Only small movements (of the order of 5 degrees or so)!
Check the temperature of the inlet water on the digital display mounted
on top of the PTR compressor a few minutes after adjustment. Keep it
between 10 and 30 degrees.
- Keep track of the temperature for several hours. Adjust it by turning
the PTR primary valve which regulates the flow of cooling water. NB!
Small movements.
Starting the PTR to cool NOTCam from warm state
- Make sure the array controller is turned off.
- Let NOTCam continue to pump. (Leave the pump running until the moment
you start filling NOTCam with LN2.)
- Turn on the PTR by pressing the green button on the front panel of
the compressor (located in the machine room). Usually the PTR is
running for 18-24 hours before filling with LN2.
- Keep track of the cooling water temperature for a while. You can read it
on the digital display on top of the compressor. It can also be
monitored from the
NOT Thermal Monitoring system, where you select sensor 367. The
cooling water should be between 10 and 30 degrees. If it is not, then
check the Special PTR instructions above.
- If this is the start-up of NOTCam cooling after an opening, then
the email warning system about the PTR coolant temperature has been
stopped and must be restarted. This is done from the
TMS Alert Control web interface where you activate sensor 367 with
min = 10.00 and max = 30.00 to be checked hourly and recipients=dstaff.
Make sure the information to follow the email text is correct.
Continue cooling NOTCam from warm state with LN2
When using liquid nitrogen (LN2) always wear the provided gloves, full face
mask, proper shoes (not open toe sandals) and apron!
- NB! Even if the PTR has been running for 18-24 hours first, it will take
at least 40 hours from the moment LN2 is filled for the first time until
the detector reaches operating temperature (with proper refillings).
Always start the LN2 filling at the latest 2 days before the day/night
when NOTCam is scheduled for use.
- NB! LN2 filling is something you should start doing in the morning. You
will need to refill NOTCam several times during the day (typically
within 1-2 hours and then again after 7-8 hours).
- NB! Let the vacuum pump keep pumping during the first stages of filling!
- To stop pumping do the following: close the vacuum valve to the
instrument, then the valve on the pump.
Verify that both are closed, and turn off the pump. Disconnect the pump
from the instrument, and start immediately to fill with LN2.
  When filling with LN2, open one of the dome side ports a small amount
  to ensure adequate ventilation.  If the dewar is cooled from room
  temperature with LN2 then a large volume of gaseous nitrogen is vented
  into the dome in a short time and may displace sufficient oxygen to
                                kill you!
- Use the NOTCam filling nozzle (the wide and short one) connected to
the LN2 bottle. Pull out the "cork" plugged into the NOTCam fill tube
and insert the filling nozzle. Clamp it with the right-angle
metal clamp attached to the structure. Open the valve slowly.
- There should not be any leaking/dripping of LN2 while filling. There
will be a loud whistling sound. Use the ear protection. You will notice
that
NOTCam starts to become full when this sound disappears, and right
after LN2 will pour out on the floor. Close the valve immediately.
Remove the LN2 bottle,
and close the fill tube with its cork. Note that the cork should be
introduced only so far that the first black o-ring is inside.
- Check the temperature logging.
You can do this from the web page
NOT Thermal Monitoring System where you select the sensors 500,
502 and 503. Alternatively, use any computer and login on marissa
as obs. Then type tail -f /home/software/notcam/NOTCAM_temp.
Each five minutes four different temperatures
and the pressure is updated. The first temperature is the cold table, the
next is the outer vessel (typically reflecting the dome temperature), the
third is the center wheel section, and the forth is the array temperature.
The last value is the pressure in mbar.
Mon Apr 7 10:17:47 2003 1049707067 -201.60 3.80 -197.30 -196.30 4.16e-05
- When NOTCam has reached below -190.0 degrees (detector), then start
the automatic TMS email alerts. This is done from the web interface
TMS Alert Control where you set min=-205, max=-195, frequency=hourly
and recipients=dstaff. Check that the text to go with the email is OK.
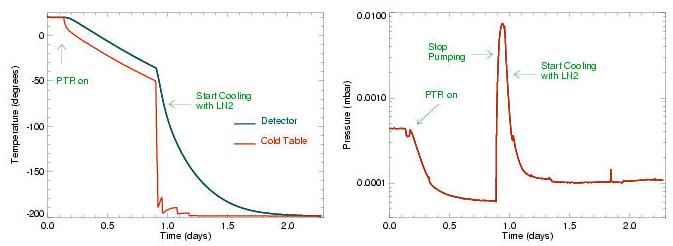
Example of temperature and pressure during cooling
|